Ultimate Tutorial: Converting 1080P Outputs to Crisp 4K Screenshots on Any Monitor
Ultimate Tutorial: Converting 1080P Outputs to Crisp 4K Screenshots on Any Monitor
Key Takeaways
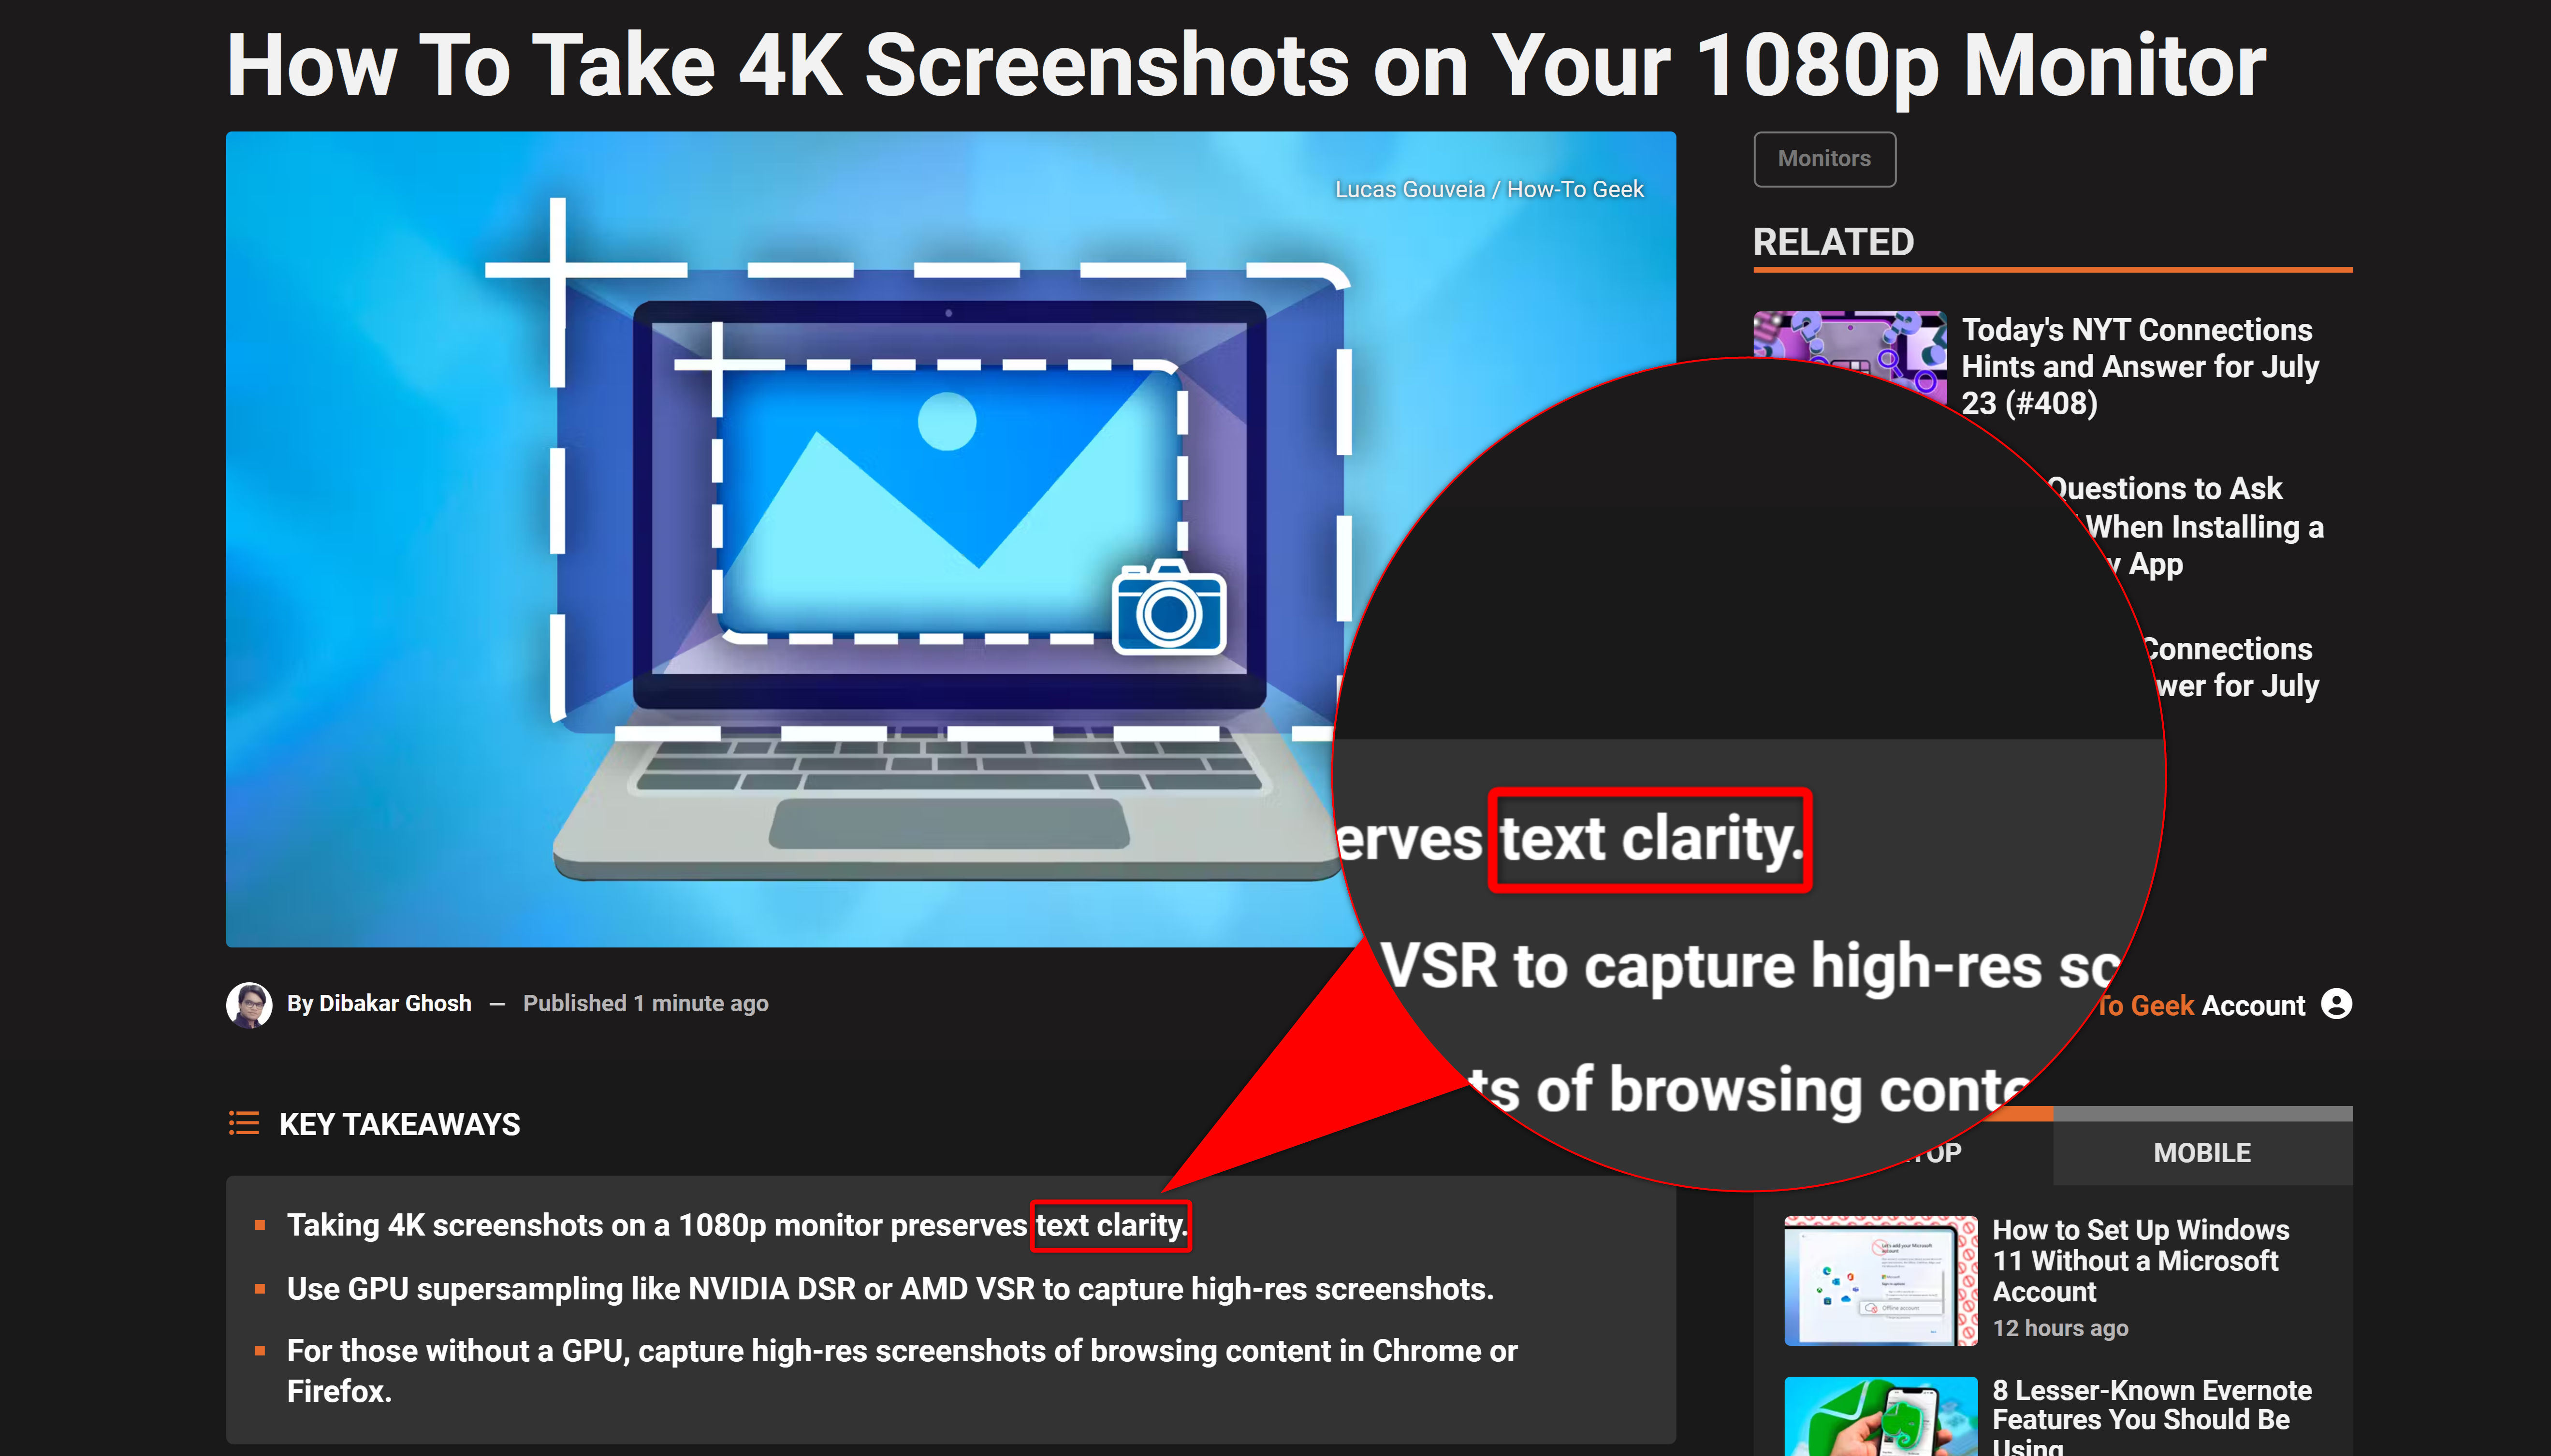
- Taking 4K screenshots on a 1080p monitor preserves text clarity.
- Use GPU supersampling like NVIDIA DSR or AMD VSR to capture high-res screenshots.
- For those without a GPU, capture high-res screenshots of browsing content in Chrome or Firefox.
Have you ever zoomed in on a screenshot only to find it turning into a pixelated mess? Or ever wish you could capture every detail of your favorite game without investing in an expensive 4K monitor? Well, here’s how you can take take 4K screenshots on your 1080p monitor.
Why You’d Want to Take 4k Screenshots on Your 1080p Monitor
Before we jump into the how, let’s talk about the why you might want to do this. Taking 4K screenshots on a 1080p monitor isn’t just a neat party trick—it has some serious practical benefits.
The most pragmatic use case is preserving text clarity. On a 1080p monitor, text in screenshots can become pixelated. However, with a 4K screenshot, even if you zoom in on particular areas, the text remains legible. This is extremely useful in office situations where you need to share screenshots of your desktop or a specific app. Whether you’re collaborating on a design or sending error messages to tech support, having 4K screenshots to share with people is really valuable.
The benefits become more non-negotiable for designers and content creators, who always want to provide their audience and clients with the highest-quality materials. For instance, as a writer, I need to share detailed tutorials and guides with you.
I personally run a 1080p monitor , and if I take a 1080p screenshot using traditional settings, most of the text inside won’t be quite legible. This is especially true if I have to crop and zoom in on a particular area.
I’ve also found 4K screenshots particularly handy in gaming situations . You can capture the highest quality details, which isn’t quite possible in a 1080p screenshot. People zoom in on stuff, and when you share your content online or on social media, there’s going to be a little bit of compression. This affects the quality of the screenshot, so having as much detail as possible helps.

How to Take High-Res Screenshots (With GPU Method)
If you’ve got a decent graphics card, you’re in luck. Both NVIDIA and AMD offer ways to take high-res screenshots through supersampling .
Supersampling is a technique where your graphics card renders an image at a higher resolution than your display and then scales it down to fit your screen. This process creates a sharper, more detailed image by essentially cramming more pixels into the same space.
Here’s how to use supersampling to take screenshots for both NVIDIA and AMD GPUs:
Enable Supersampling for NVIDIA GPU Users
NVIDIA calls its supersampling technology Dynamic Super Resolution (DSR). Here’s how to enable it:
1. Right-click on your desktop and select “NVIDIA Control Panel”. If you can’t see the option, click on “Show More Options.” It should be located in the new menu.
2. Navigate to “Manage 3D Settings” in the left sidebar.
3. Scroll down to find “DSR - Factors” in the Global Settings tab.
4. Check the box next to “4.00x (Native Resolution)”.
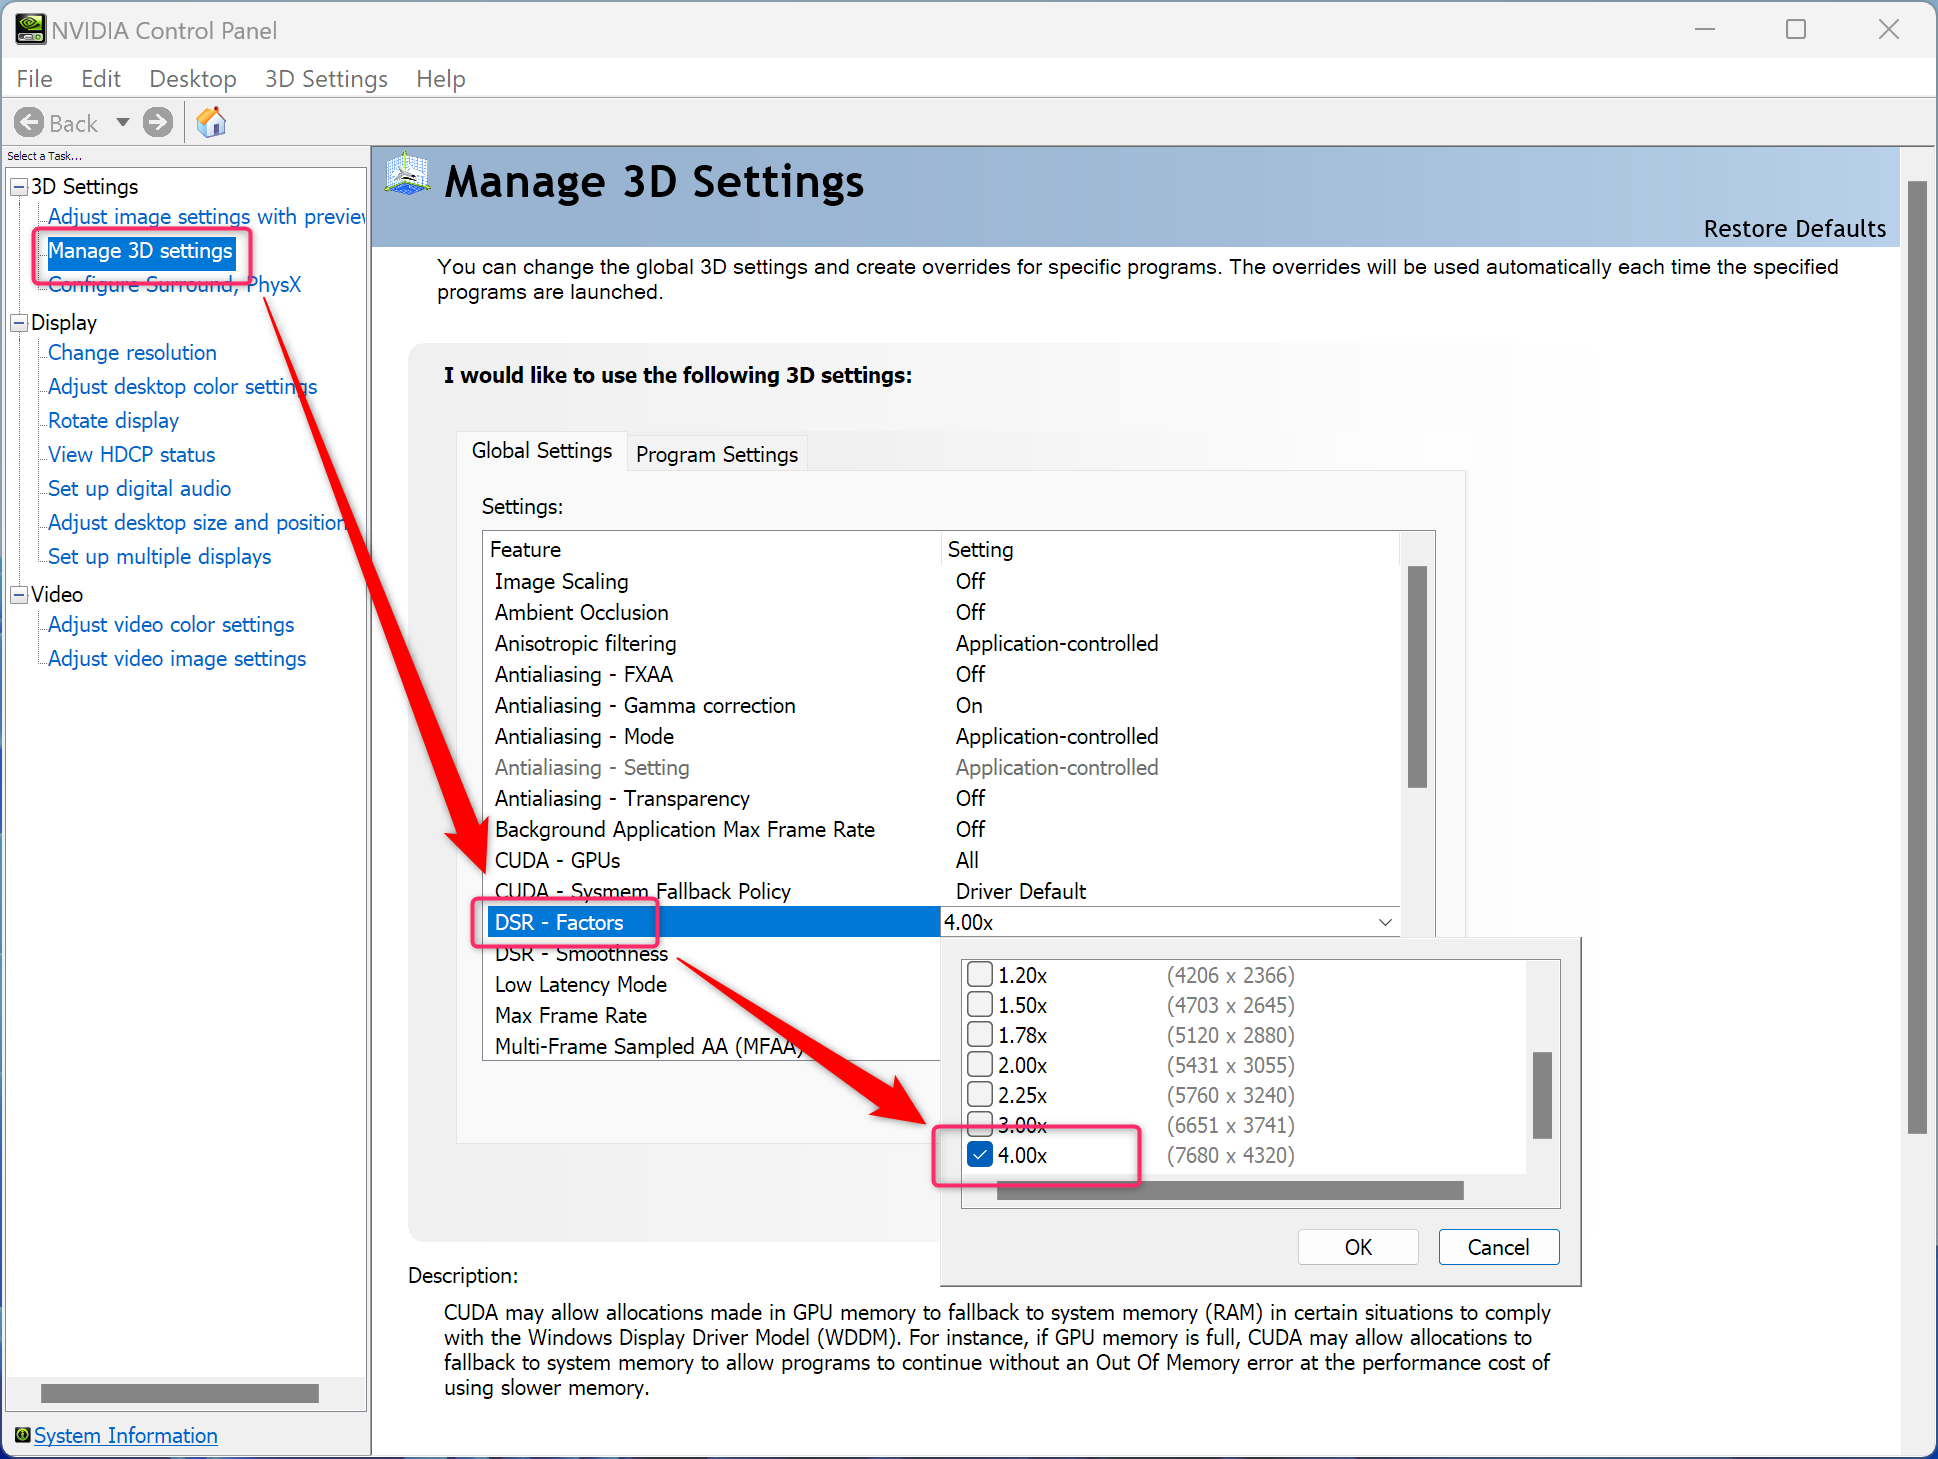
5. Click “Apply” at the bottom of the window.
6. Close the NVIDIA Control Panel and right-click on your desktop again.
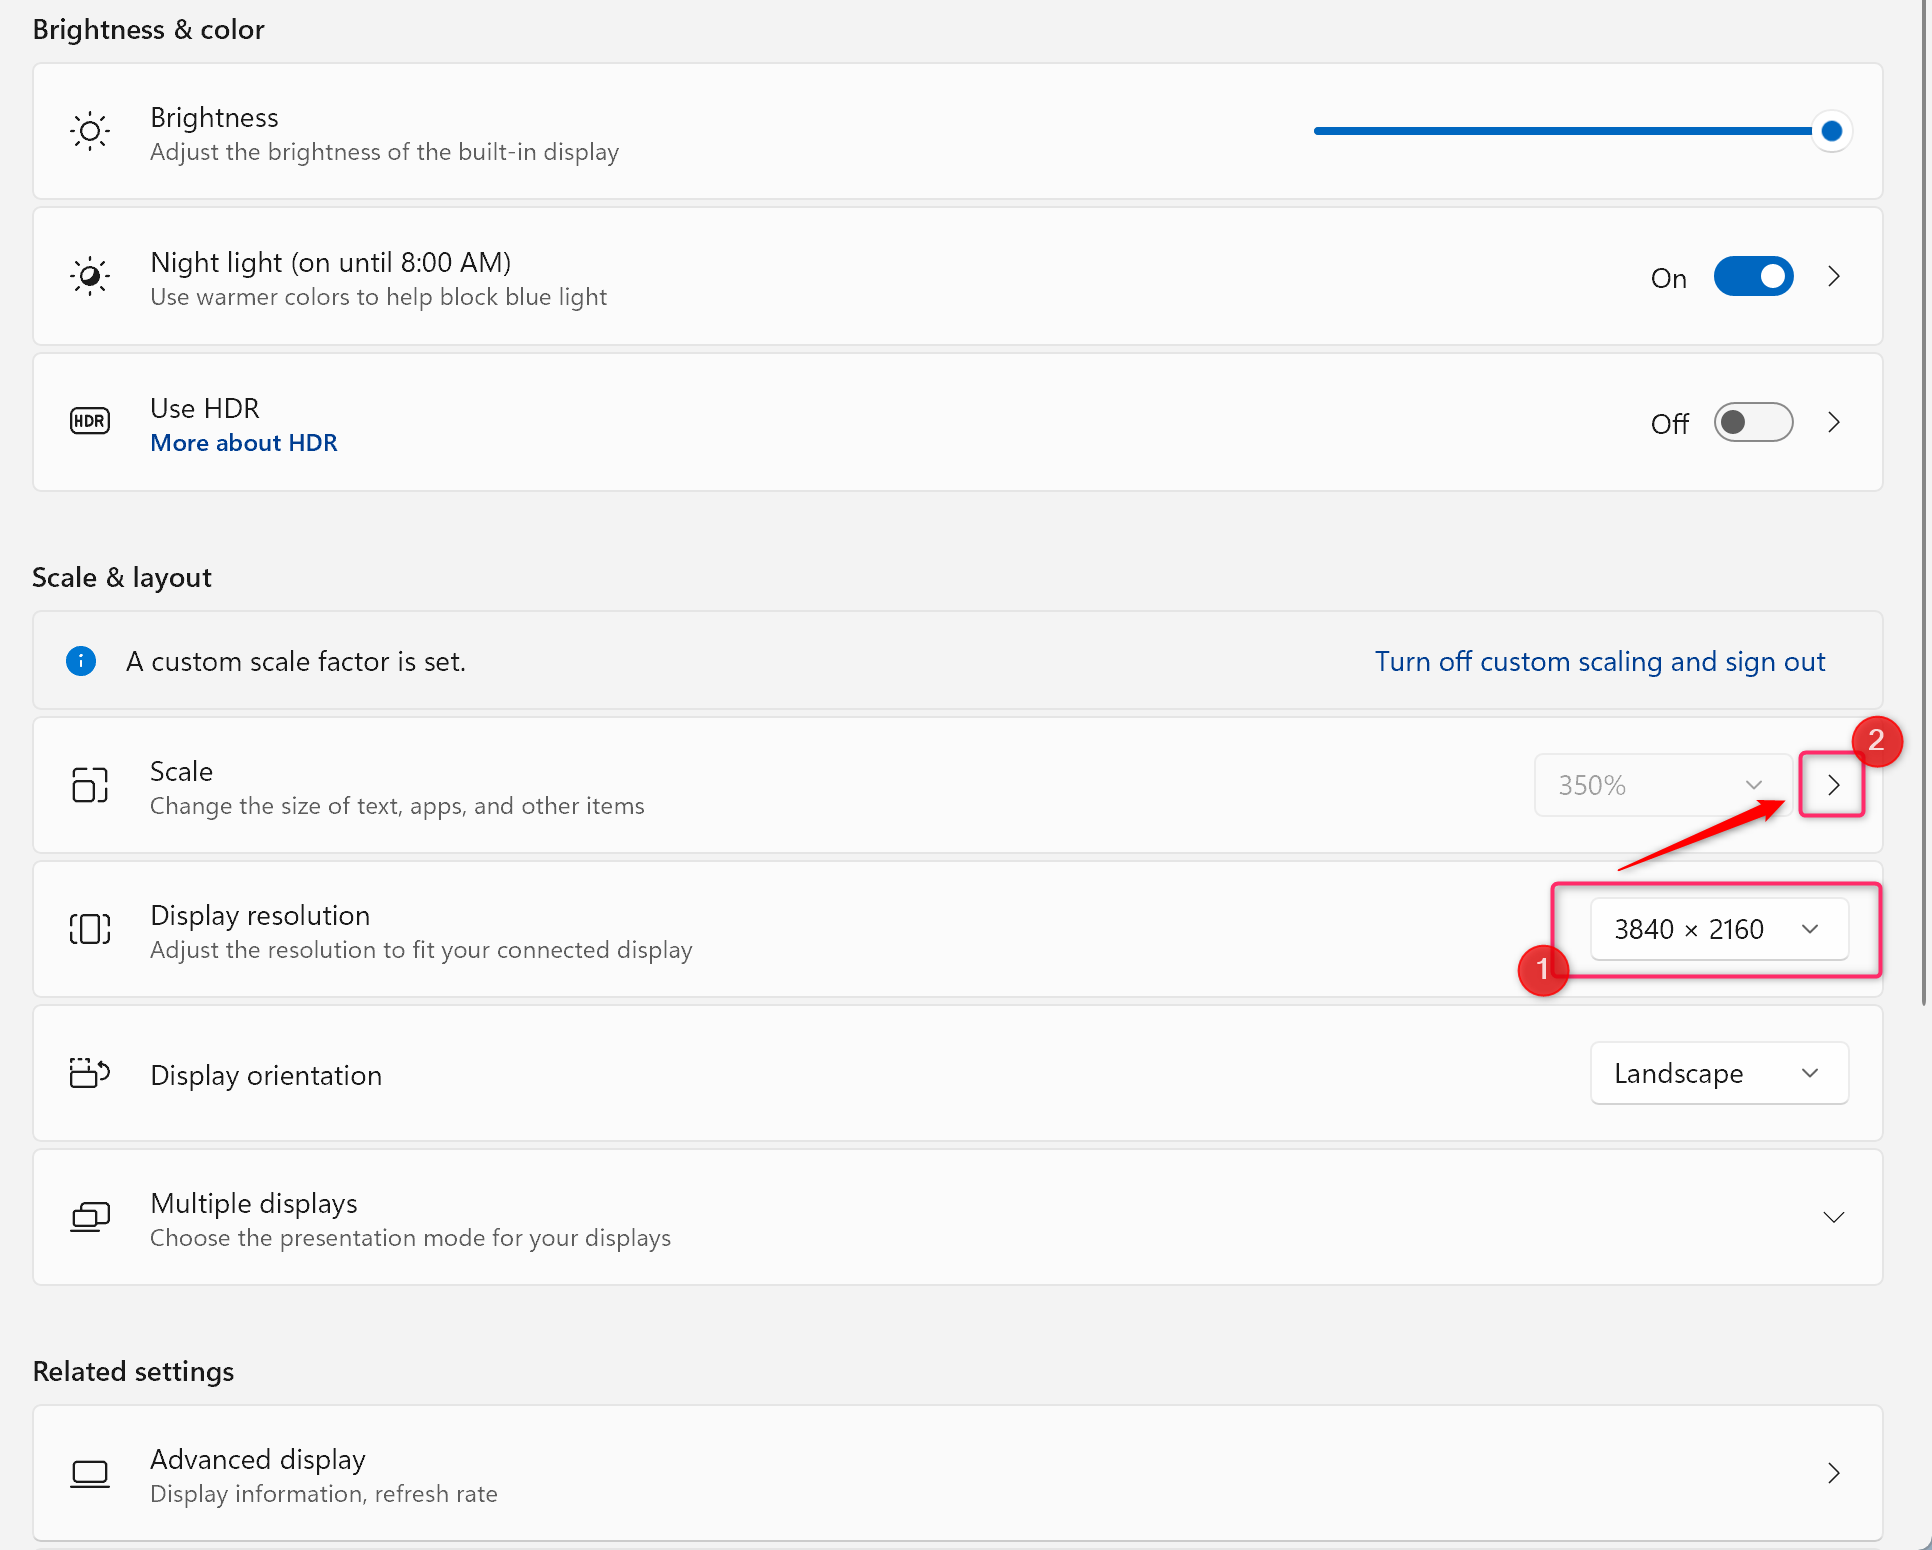
7. Select “Display Settings” and choose “3840 x 2160” as Display Resolution. After that, go into the Scale option and edit it to 200%.
9. Now, take your screenshots using your preferred method (like Windows+Print Screen).
10. Go back to Display Settings and revert to your original 1080p resolution.
Voila! You now have a 4K screenshot. The beauty of this method is that it works system-wide, allowing you to capture high-res screenshots of anything on your screen, from games to desktop applications.
For AMD GPU Users:
AMD calls their supersampling feature Virtual Super Resolution (VSR). Here’s how to use it:
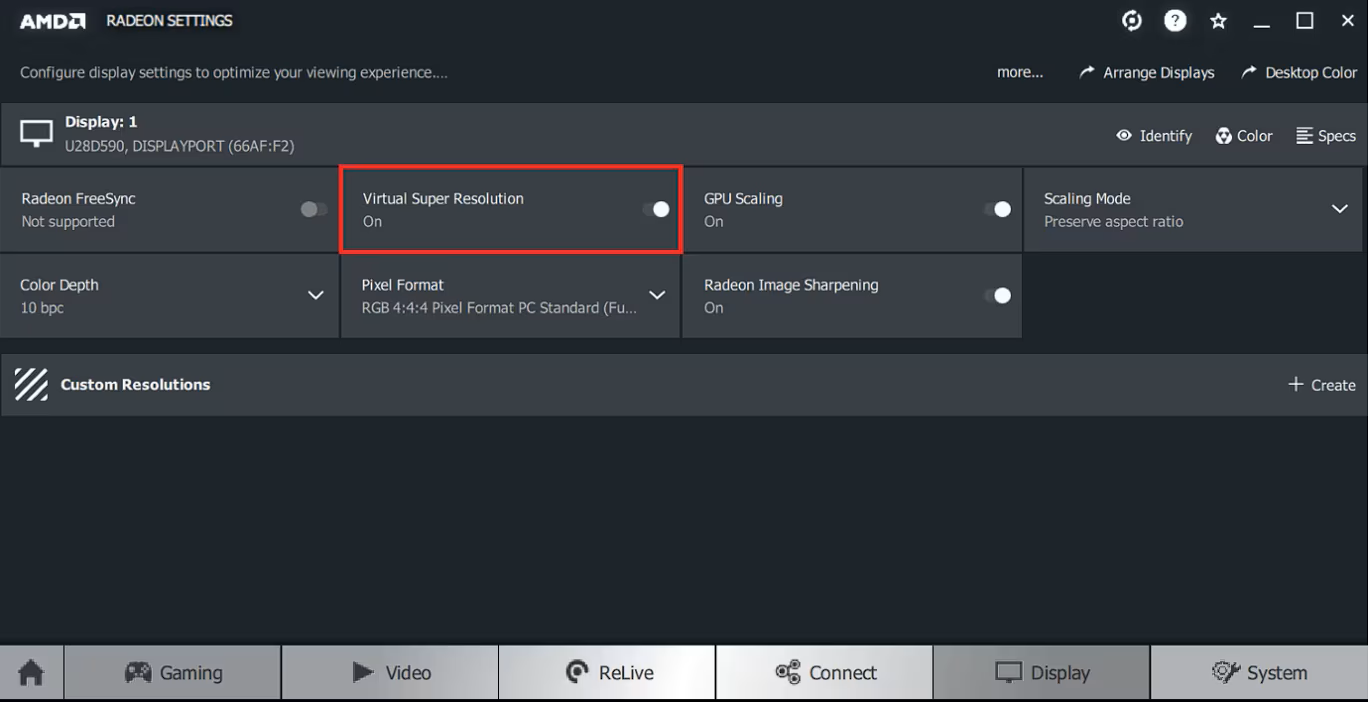
1. Open AMD Radeon Settings.
2. Click on the “Display” tab.
3. Toggle on “Virtual Super Resolution.”
AMD
4. Close AMD Radeon Settings and right-click on your desktop.
5. Select “Display settings” and choose “3840 x 2160” resolution.
6. Take your screenshot.
7. Revert to your original 1080p resolution.
As you can see, the process is slightly simpler with AMD, but the result is the same—a crisp 4K screenshot ready for your use.
Potential Drawbacks and Limitations
While these methods are incredibly useful, they’re not without their drawbacks. First and foremost, rendering at 4K will strain your GPU. You might notice slowdowns and non-optimal performance in graphically intensive applications or games compared to running at 1080p.
Don’t forget to revert to your original resolution after taking your screenshot. Running your 1080p monitor at 4K for extended periods can strain your GPU.
It’s also worth noting that these methods let you capture 4K screenshots, but they don’t provide a true 4K viewing experience. The image on your screen is still limited by your 1080p display.
How To Take High-Res Screenshots (No GPU Method)
If you don’t have a dedicated GPU to take advantage of supersampling, you can still capture high-res screenshots using your web browser.
This technique will not work system-wide and only allows you to take screenshots of your content displayed inside your browser, i.e., websites or web apps. That said, considering how most of us use web apps and websites for almost all our work, this technique should still prove useful.
For Chrome and Chromium-Based Browser
Open Google Chrome or the Chromium-based browser that you use, i.e., Edge, Brave, etc., and navigate to the webpage you want to capture. Now follow these steps:
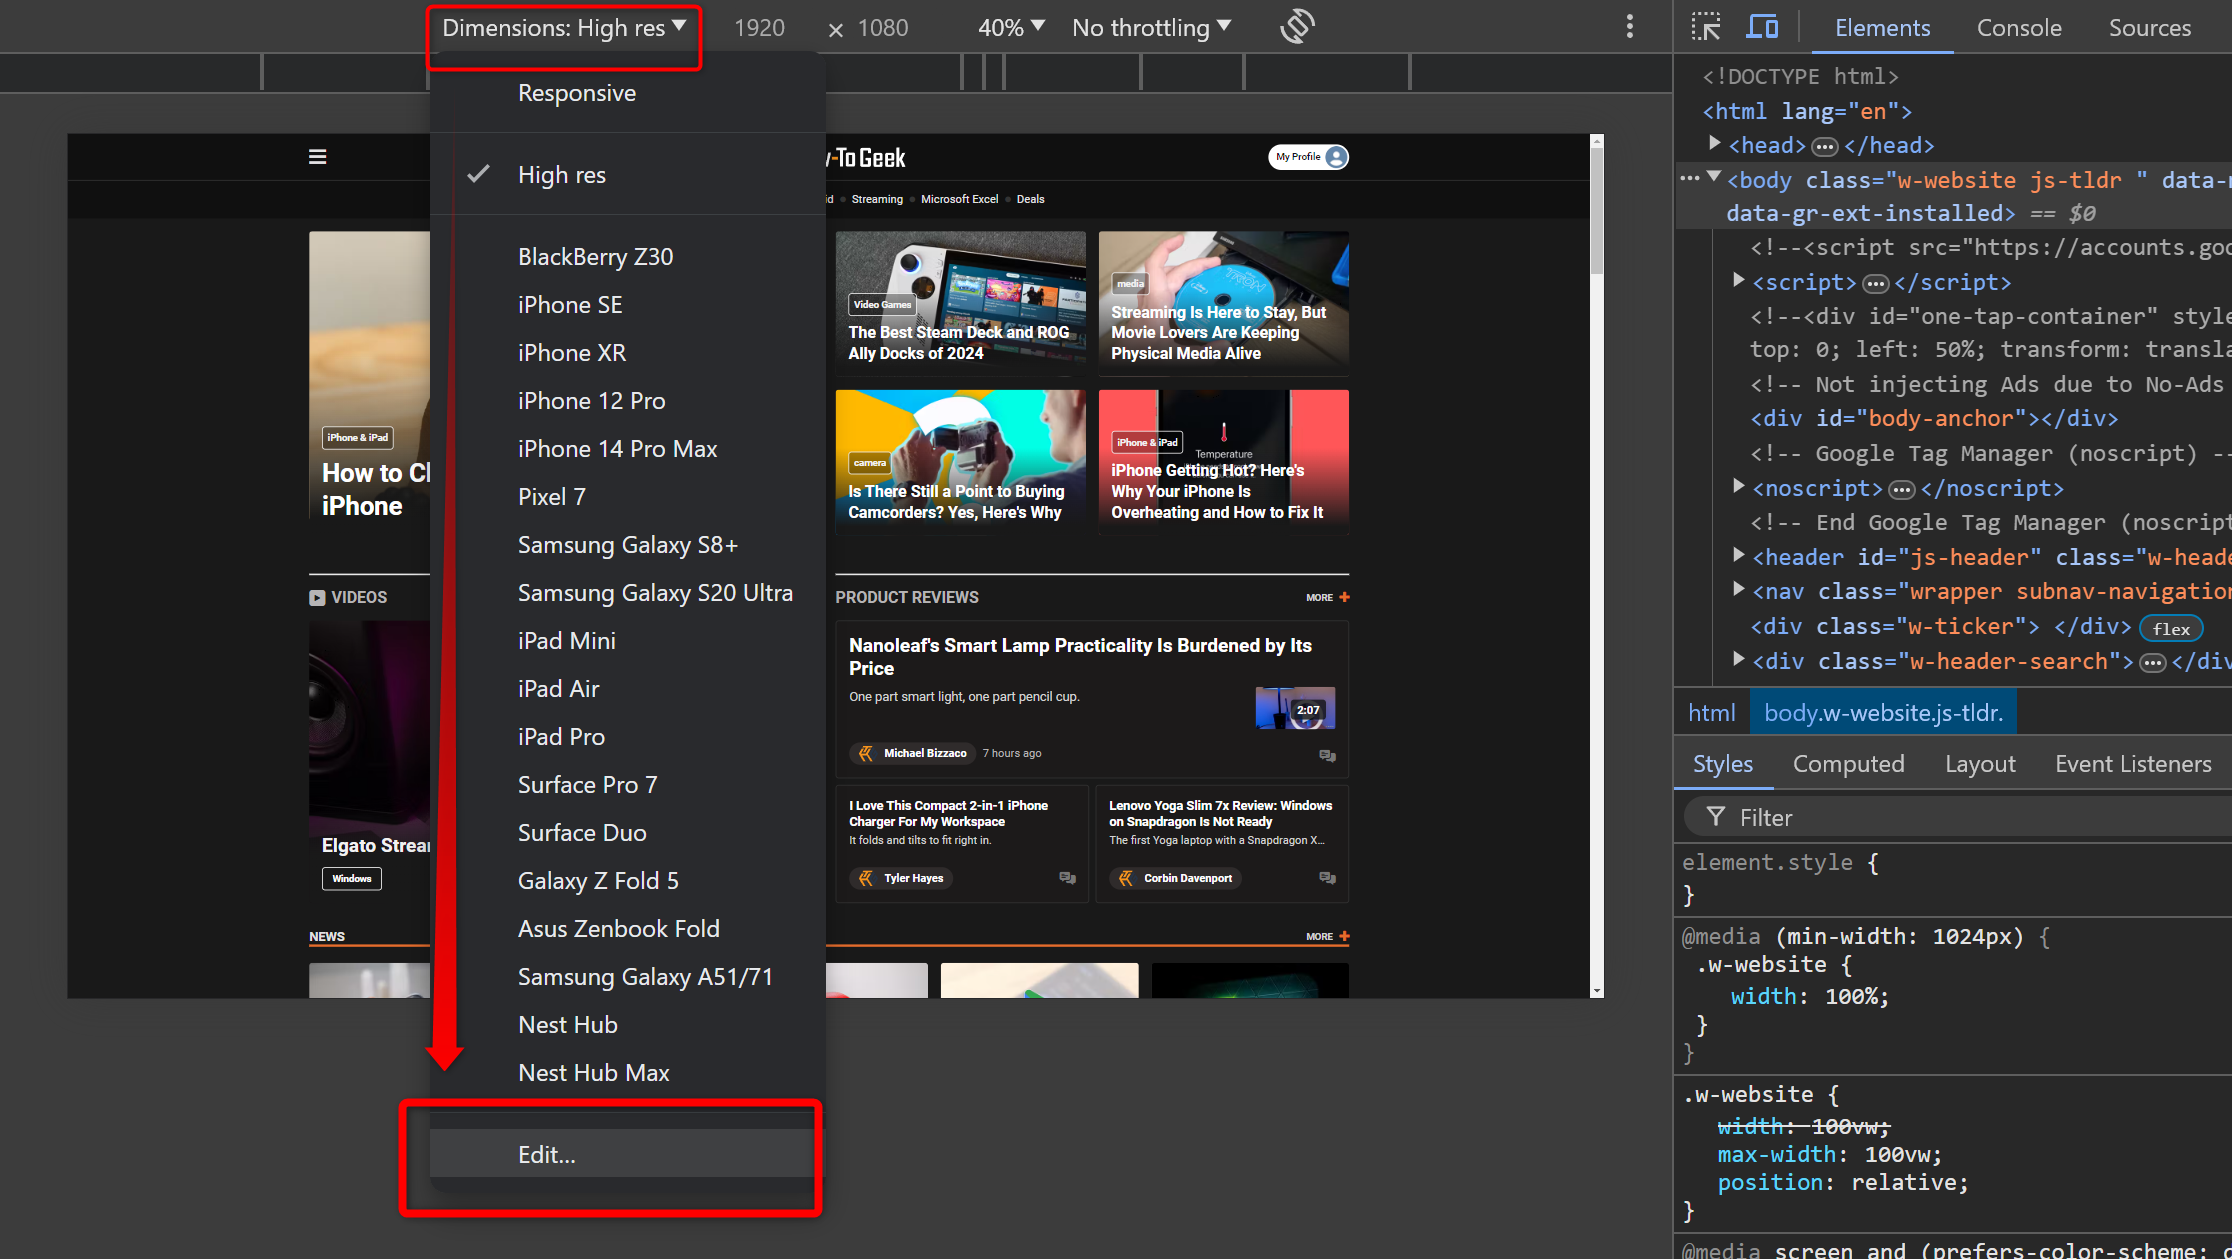
1. Press Ctrl+Shift+i (or Cmd+Option+i on Mac) to open Developer Tools.
2. Press Ctrl+Shift+M (or Cmd+Option+M on Mac) to toggle the device toolbar.
3. In the device toolbar, click the “Responsive” dropdown and select “Edit.”
4. Click on”Add Custom Device.”
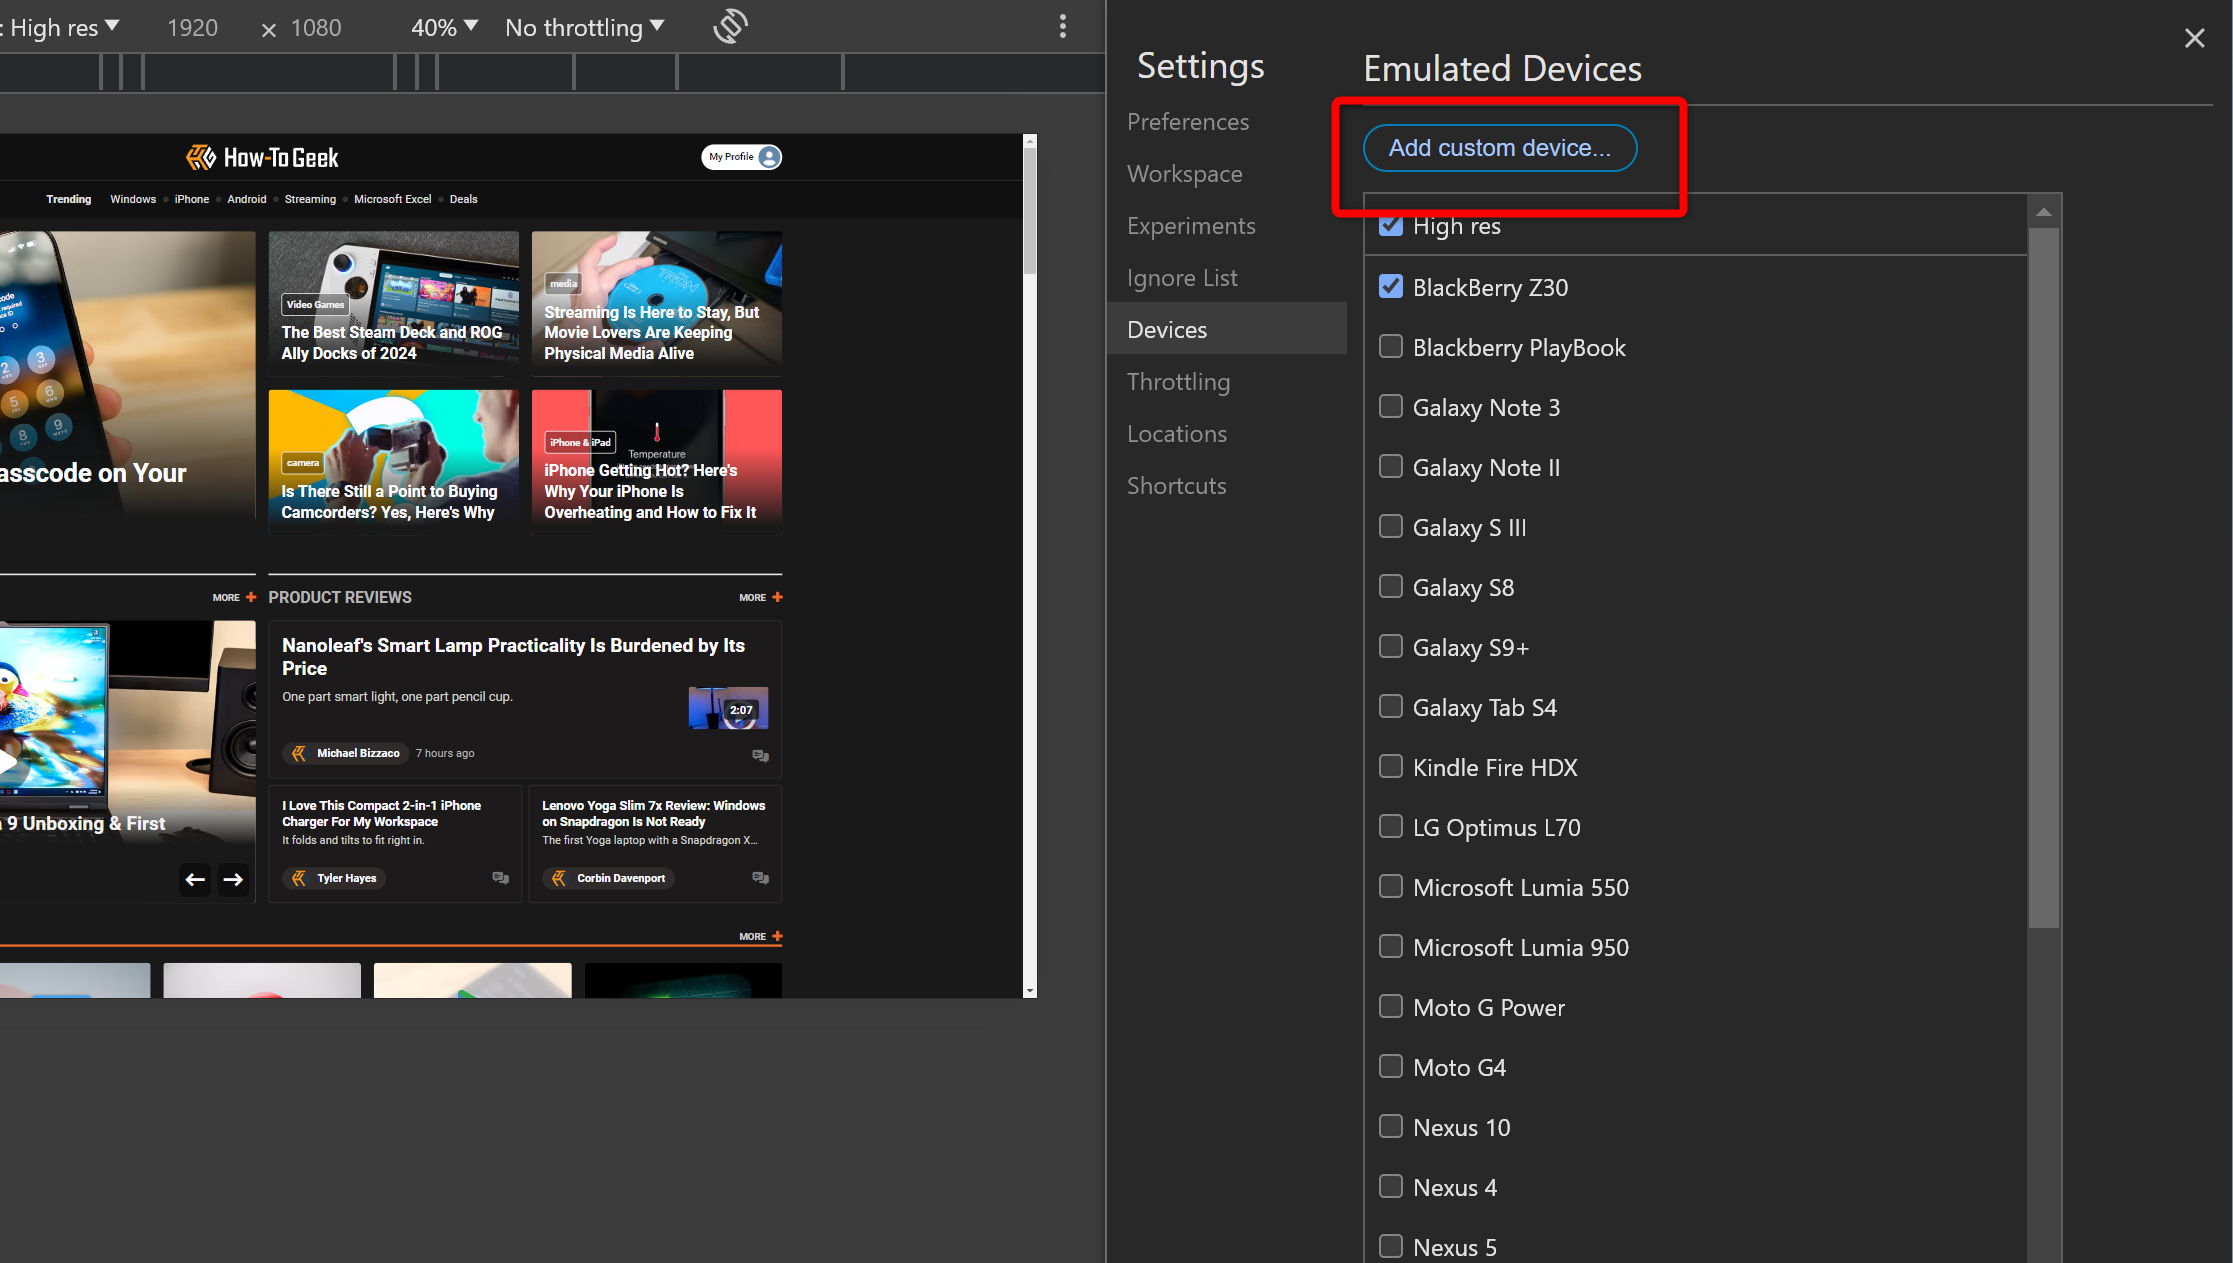

5. Enter these settings:
- Device Name: Anything you like to remember as this setting
- Width: 1920
- Height: 1080
- Device Pixel Ratio: 4
- User Agent String: Desktop

6. Click on Save to save these settings as a new Custom Device.
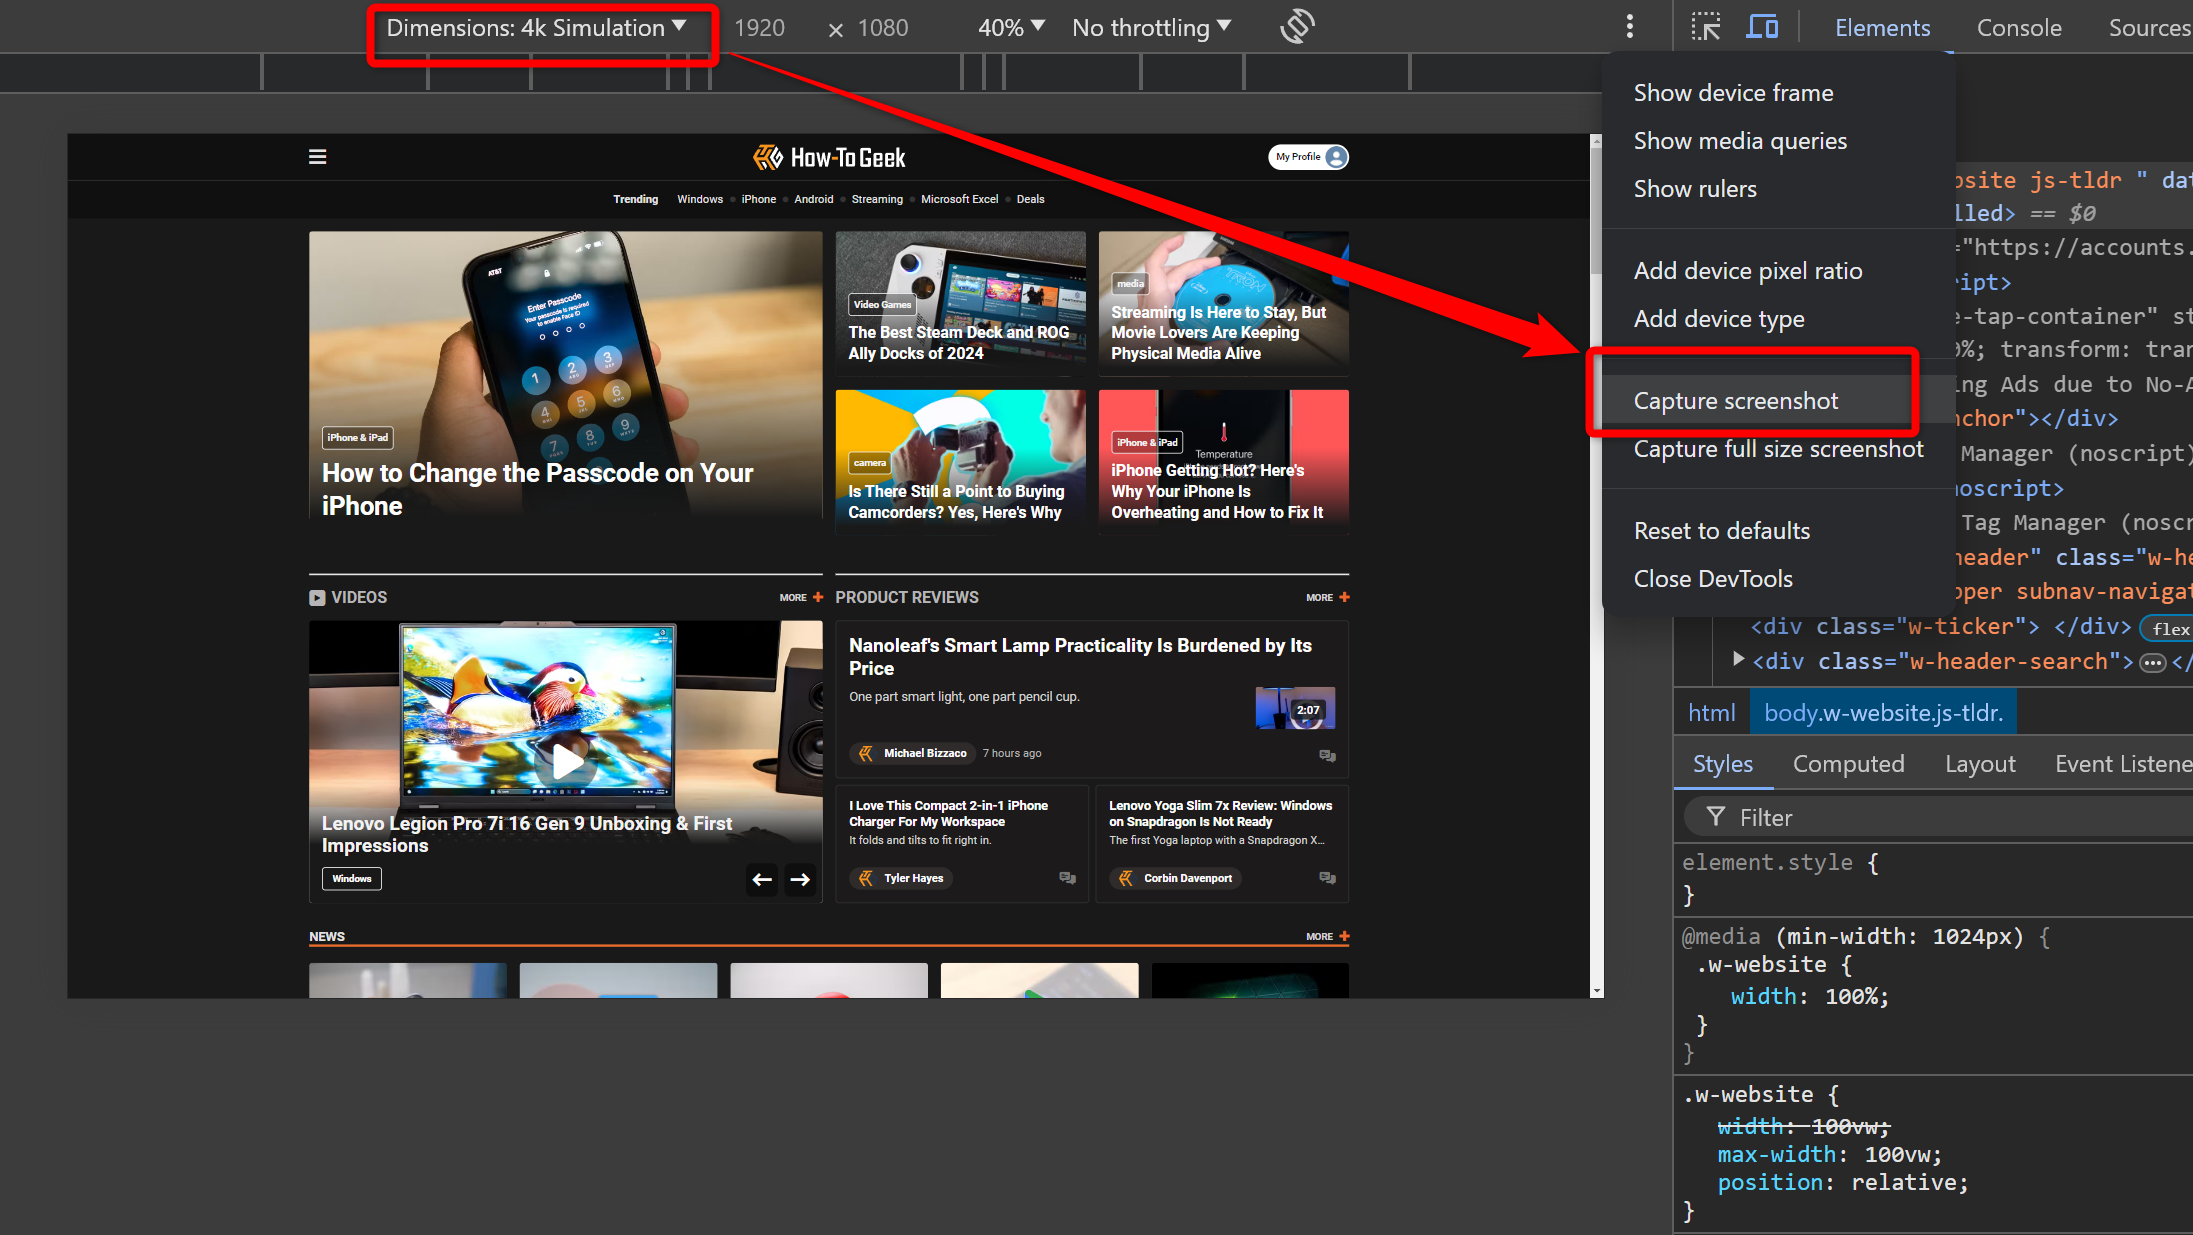
7. Select your new 4K device from the dropdown. It should be the topmost option.
8. Use Chrome’s built-in screenshot tool in Developer Tools to capture your 4K screenshot.
Once you created the new 4K Custom Device, you can jump straight to step 5 when you want to take new 4K screenshots of a different website or web app.
For Mozilla Firefox And Its Forks
If you are team Mozilla and don’t use Chrome, you can still use this feature. Surprisingly, the process is very similar, just the UI is different.
First, visit the website or web app you want to capture and then follow these steps:
1. Press Ctrl+Shift+i (or Cmd+Option+I on Mac) to open Developer Tools.
2. Press Ctrl+Shift+M (or Cmd+Option+M on Mac) to toggle the device toolbar.
3. In the device toolbar, click on the “Responsive” dropdown and select “Edit List”.
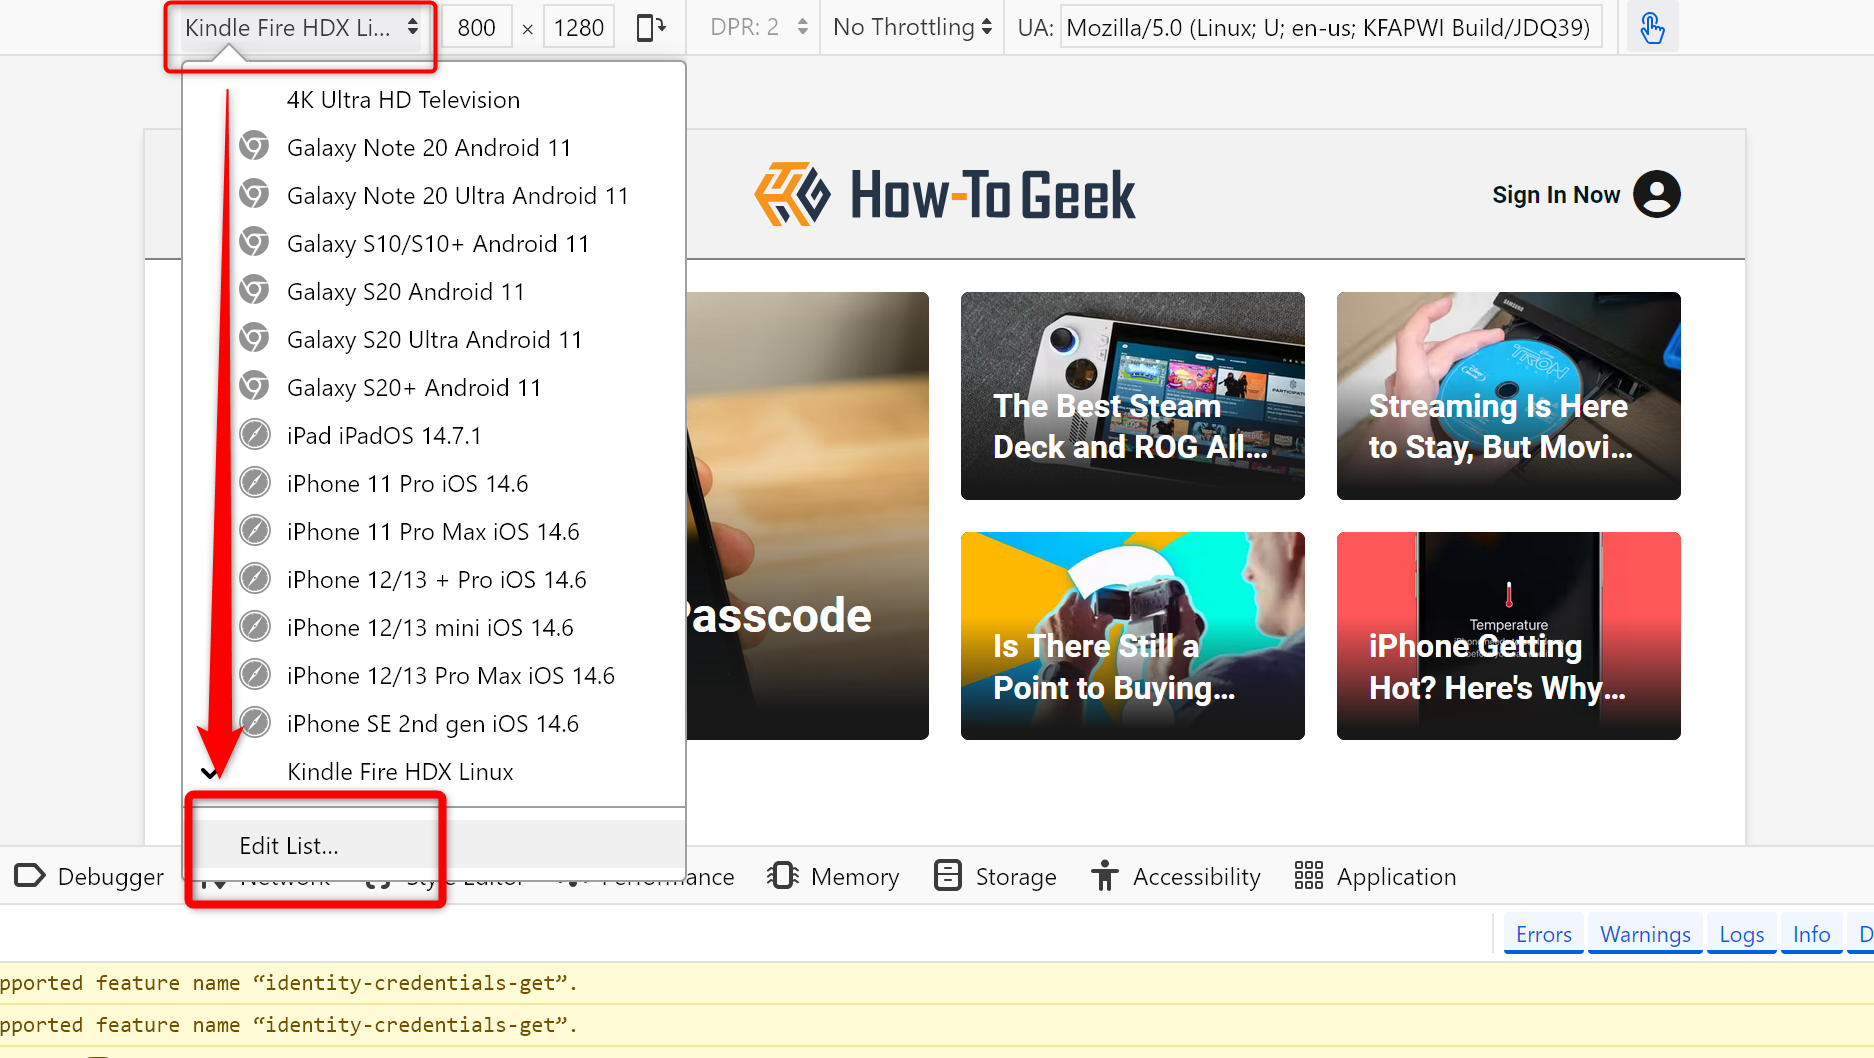

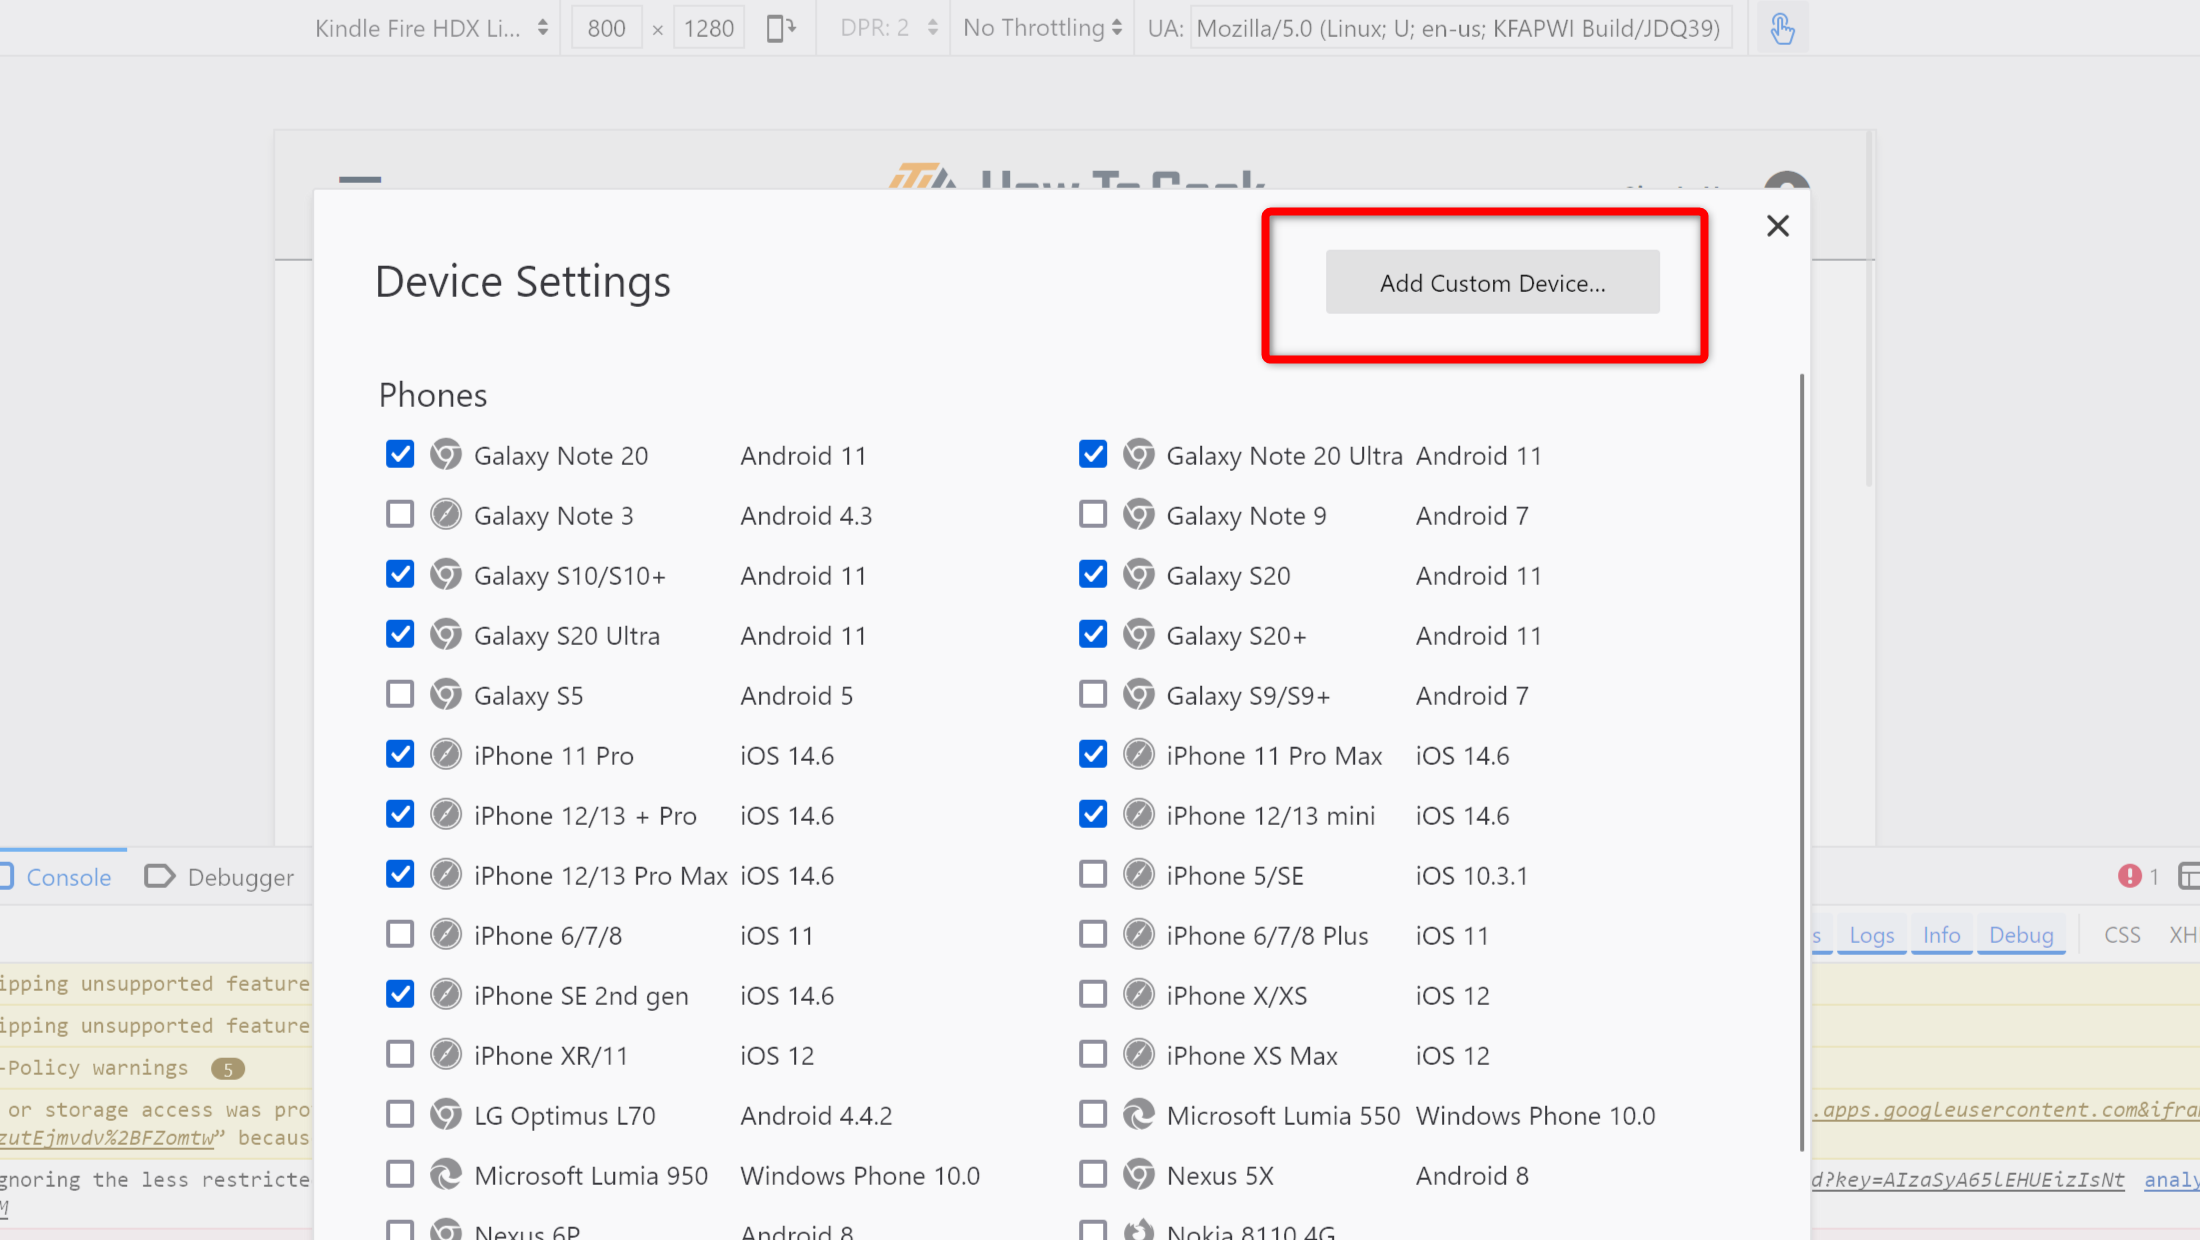
4. Click on “Add Custom Device.”
5. Enter these settings:
- Device Name: Anything you like to remember this settings
- Width: 1920
- Height: 1080
- Device Pixel Ratio: 4
- User Agent String: Don’t change anything here
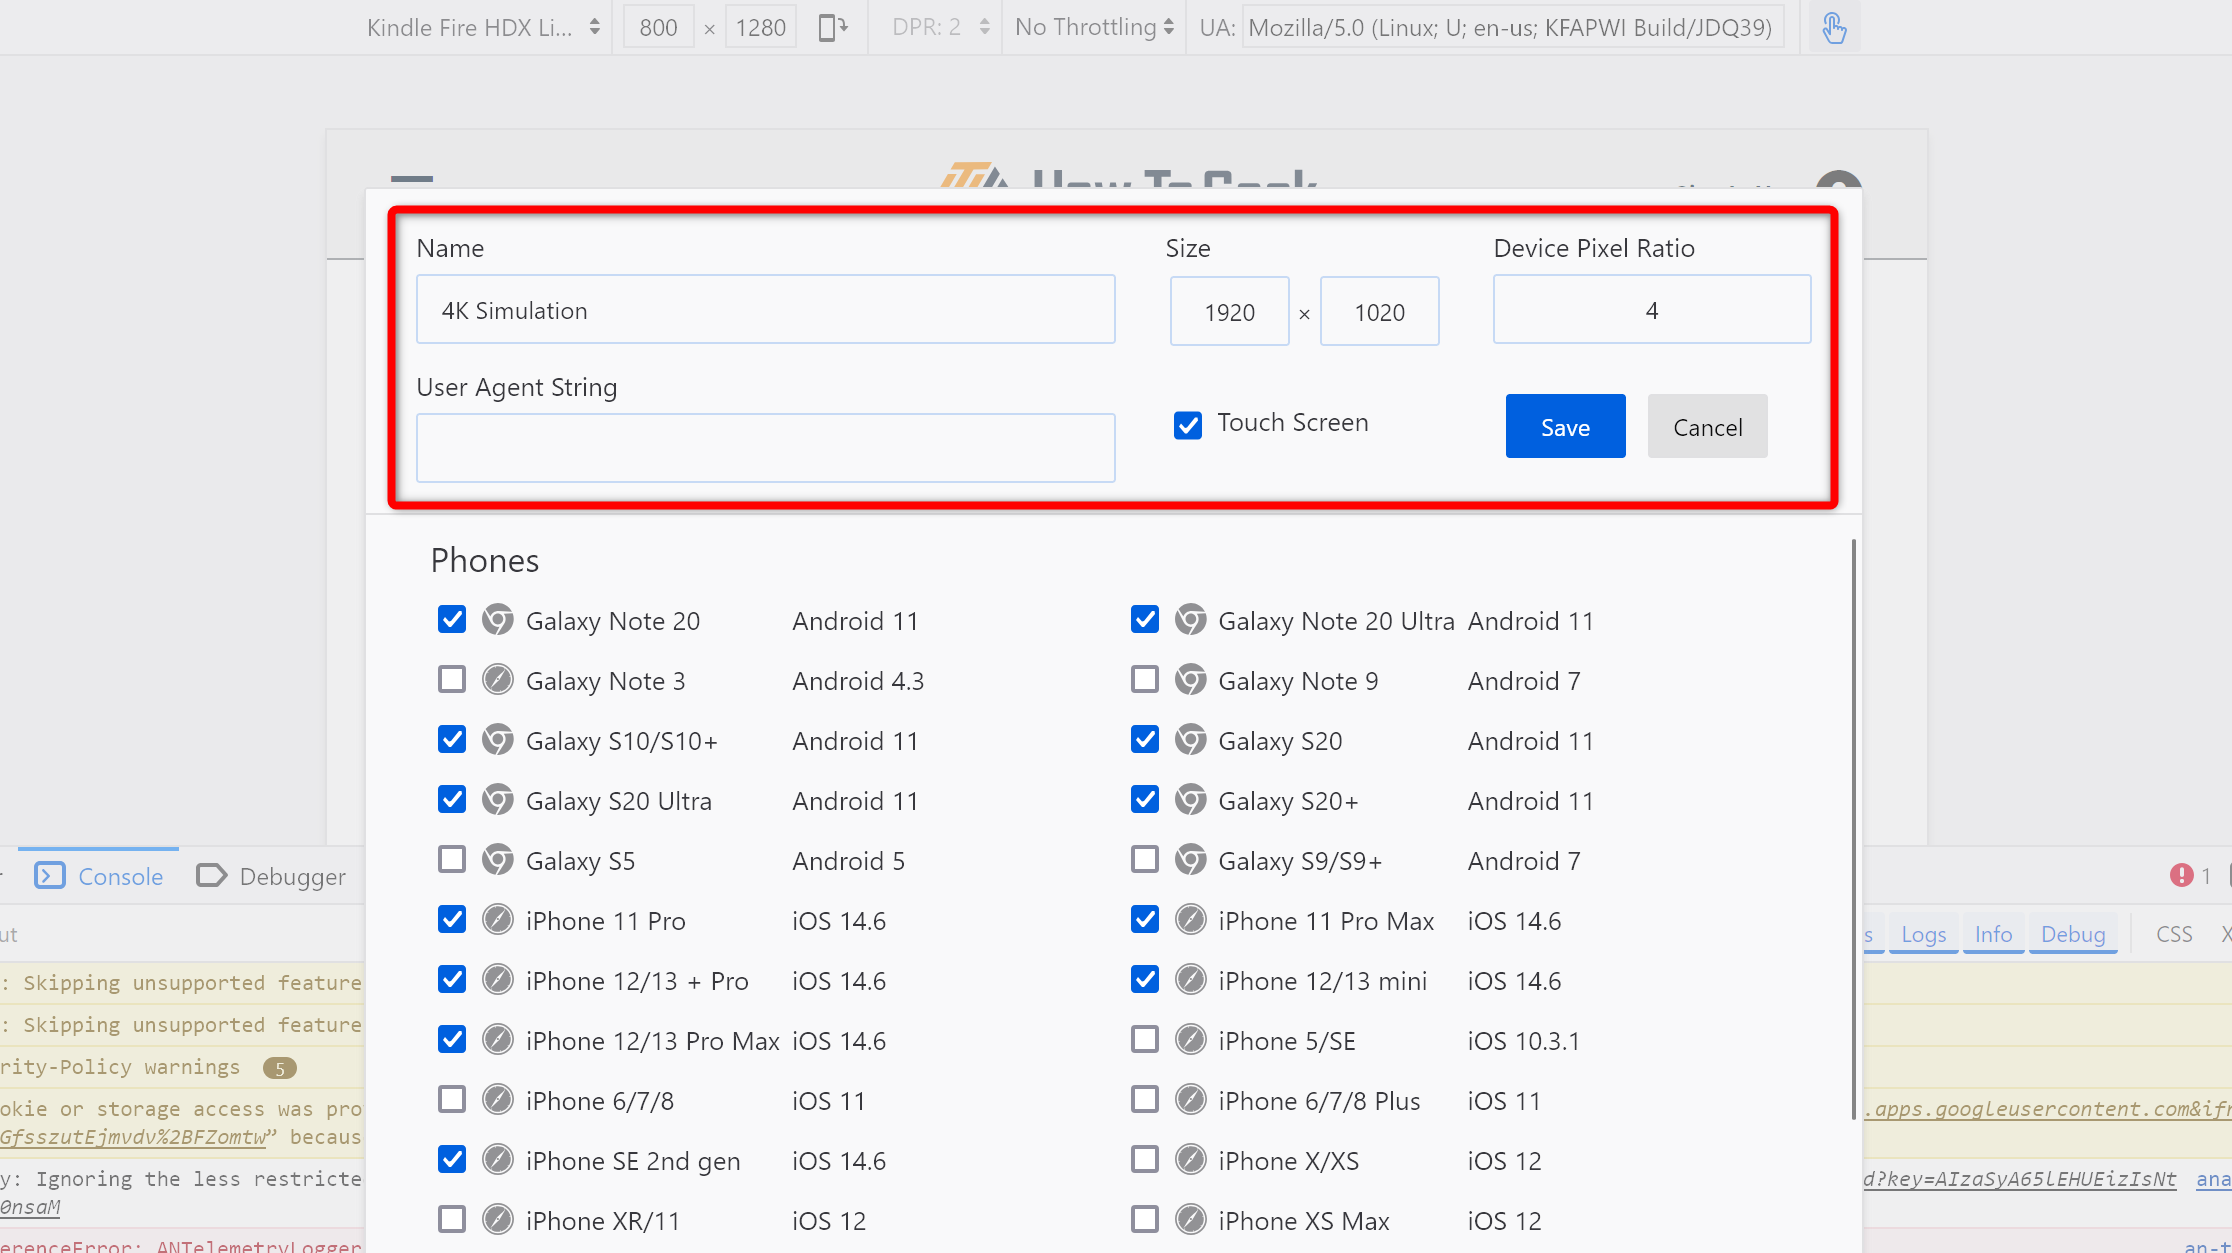

5. Click on Save to save these settings as a new Custom Device.
6. Select your new 4K device from the dropdown. It should be the top option.
7. Use Firefox’s built-in screenshot tool in Developer Tools to capture your screenshot. It is located on the top-right corner of the screen.
Voilà! You now know how to take 4K screenshots of websites or web apps on your browser while working on a 1080p monitor. The charm of this method is that you can have the browser snapped to the side, taking up minimal space on your screen, but still use this technique to take 4K screenshots of the open website in full desktop mode.
There you have it—you’re now equipped to take stunning 4K screenshots on your humble 1080p monitor. Whether using the GPU method for system-wide captures or the browser method for web content, you can say goodbye to pixelated screenshots.
- Title: Ultimate Tutorial: Converting 1080P Outputs to Crisp 4K Screenshots on Any Monitor
- Author: Frank
- Created at : 2024-08-29 01:34:15
- Updated at : 2024-08-30 01:34:15
- Link: https://tech-revival.techidaily.com/ultimate-tutorial-converting-1080p-outputs-to-crisp-4k-screenshots-on-any-monitor/
- License: This work is licensed under CC BY-NC-SA 4.0.