
Troubleshooting Windows Update Failures: A Comprehensive Guide
Effortlessly Start Your PC in Safe Mode on Windows 11 - A Comprehensive Guide to All 4 Strategies and Their Images

Safe Mode is a way to run Windows in its most basic form. It uses only absolutely essential files and drivers.
For example, in Safe Mode, your screen will display only 16 colors and a very low resolution, and you won’t be able to print documents or hear audio. It also won’t load many programs in the background.
Safe Mode is designed to help you troubleshoot computer problems.
Sometimes Windows 10 will automatically start in Safe Mode (e.g. if it has a problem loading normally). But sometimes you’ll need to start it in Safe Mode manually (e.g. if you get a blue screen error every time you start Windows).
This article explains how to manually start Windows 10 in safe mode.
4 ways to start Windows 10 in Safe Mode
- Start Safe Mode by pressing F8 at startup
- Start Safe Mode by turning off your PC 3 times
- Start Safe Mode using the System Configuration tool
- Start Safe Mode from the login screen
- Can’t solve the problem? Try this fix…

WPS Office Premium ( File Recovery, Photo Scanning, Convert PDF)–Yearly
Method 1: Start Safe Mode by pressing F8 at startup
IMPORTANT: This method must be manually enabled from within Windows. If you haven’t already enabled it, and you can’t access Windows to do so, skip to method 2 below .
First, you have to enable the F8 key method
On Windows 7, you could press the F8 key as your computer was booting to access the Advanced Boot Options menu. From there, you could access Safe Mode.
But on Windows 10, the F8 key method doesn’t work by default. You have to manually enable it.
Here’s how to get the F8 key to start Safe Mode in Windows 10:
- Click theWindows start menu and typecmd , then clickRun as administrator :
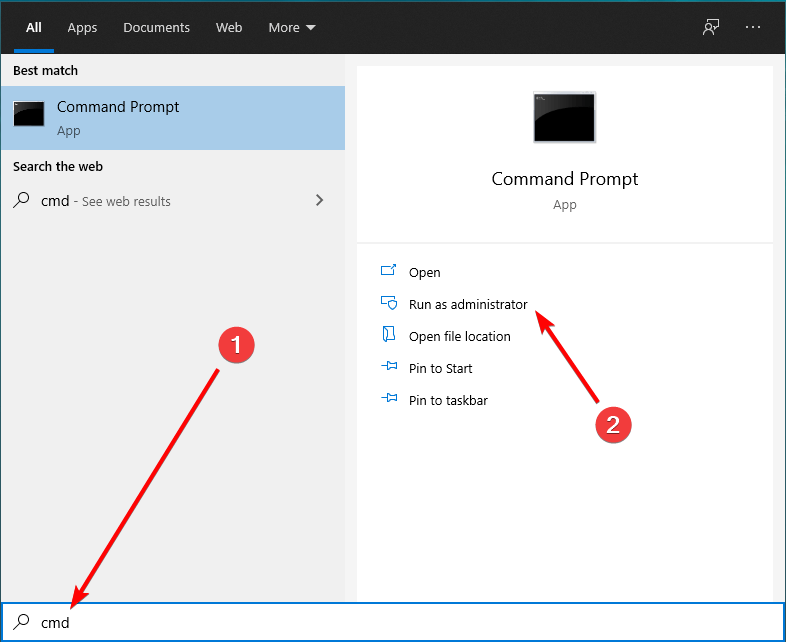
- Copy this command:
bcdedit /set {default} bootmenupolicy legacy
- Paste the copied command into the Command Prompt (right-click in the Command Prompt to paste), then press theEnter key on your keyboard.

- Reboot your PC.
 OtsAV DJ Pro
Now you can start Safe Mode using the F8 key
Now that you’ve enabled the F8 method, you can use it to start Safe Mode:
Ensure your computer is turned off.
Turn your computer on.
Before anything appears on your screen, pressF8 repeatedly until the Boot Options menu below displays. Then selectSafe Mode .
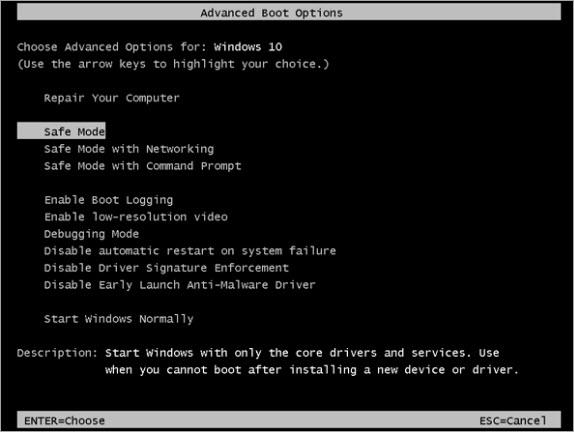
If the Boot Options menu above doesn’t display, and instead Windows just launches normally, it’s likely that you didn’t press F8 early enough.
Method 2: Start Safe Mode by turning off your PC 3 times
If you’re unable to launch Windows, and you haven’t enabled the F8 method above, this is how to start Safe Mode:
Ensure your computer is off.
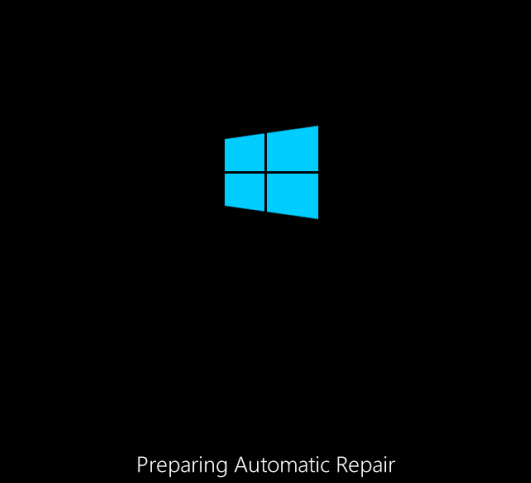
Press the power button to turn on your PC, and when you see the small spinning circle of dots that indicates Windows is starting, press and hold the power button until your PC shuts down. You’ll have to hold it for 4-5 seconds.
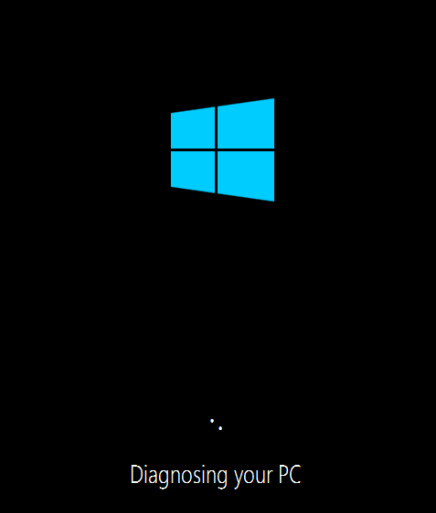
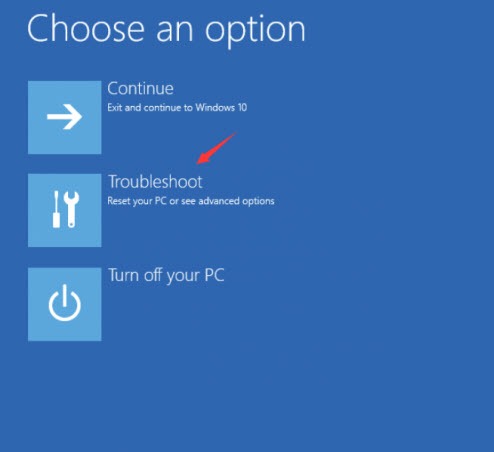
Do this again, and then again. After you’ve done it 3 times, start your computer again and let it run. It should now go into Automatic Repair mode:

- Wait for Windows to diagnose your PC:
- ClickAdvanced Options :

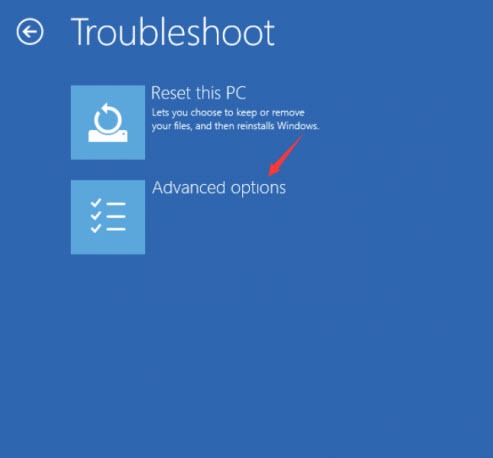
- ClickTroubleshoot :
- ClickAdvanced options :
- ClickStartup Settings :

- ClickRestart .
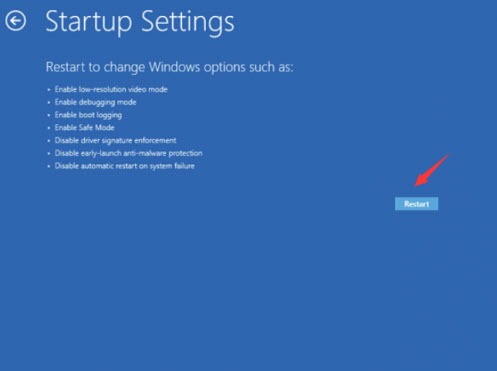
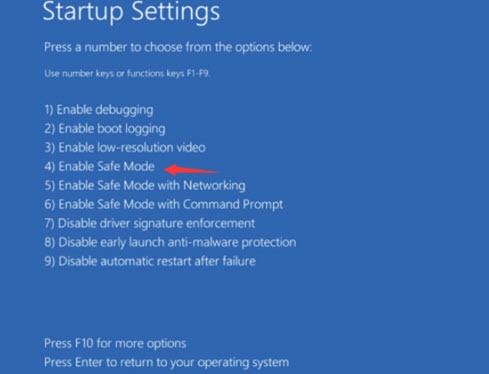
Your computer will restart and present a list of different startup options.
- On your keyboard, press the number4 key to enter Safe Mode without internet access or the number5 key to enter Safe Mode with internet access:

Method 3: Start Safe Mode using the System Configuration tool
IMPORTANT: If you follow these instructions, Windows will start in Safe Mode every time it restarts, until you undo your changes.
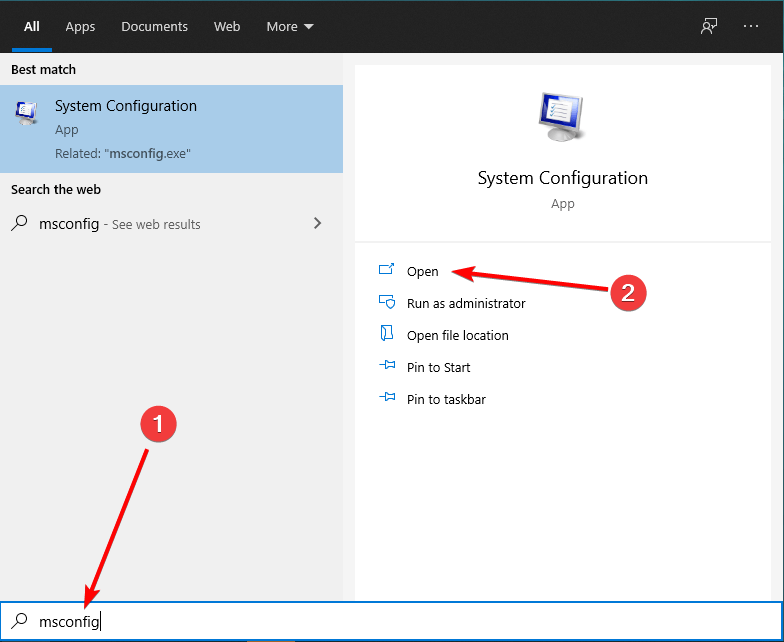
If you’re able to launch Windows normally, you can boot into Safe Mode using the System Configuration tool:
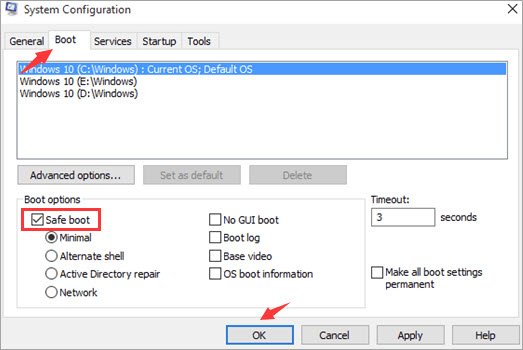
- Click theWindows start menu and typemsconfig , then clickOpen :
- Select the Boot tab, then check Safe boot and click OK .
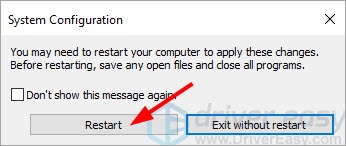
- When you’re prompted to restart your computer to apply these changes, click Restart and you’ll boot into Safe Mode.
To turn off Safe Mode and go back to normal mode
When you want to return Windows to normal mode, you just have to undo your changes:
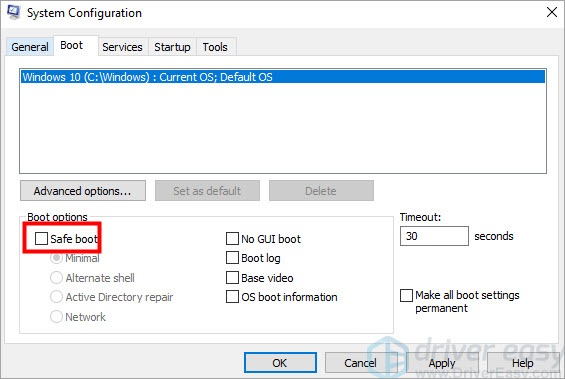
- Click theWindows start menu and typemsconfig , then clickOpen :
- Select the Boot tab, then UNcheck Safe boot and click OK .
 Project Manager - Asset Browser for 3Ds Max
- When you’re prompted to restart your computer to apply these changes, click Restart and you’ll boot into normal mode.

Key features:
• Import from any devices and cams, including GoPro and drones. All formats supported. Сurrently the only free video editor that allows users to export in a new H265/HEVC codec, something essential for those working with 4K and HD.
• Everything for hassle-free basic editing: cut, crop and merge files, add titles and favorite music
• Visual effects, advanced color correction and trendy Instagram-like filters
• All multimedia processing done from one app: video editing capabilities reinforced by a video converter, a screen capture, a video capture, a disc burner and a YouTube uploader
• Non-linear editing: edit several files with simultaneously
• Easy export to social networks: special profiles for YouTube, Facebook, Vimeo, Twitter and Instagram
• High quality export – no conversion quality loss, double export speed even of HD files due to hardware acceleration
• Stabilization tool will turn shaky or jittery footage into a more stable video automatically.
• Essential toolset for professional video editing: blending modes, Mask tool, advanced multiple-color Chroma Key
Method 4: Start Safe Mode from the login screen
If you can boot to the login screen, you can enter Safe Mode from there:
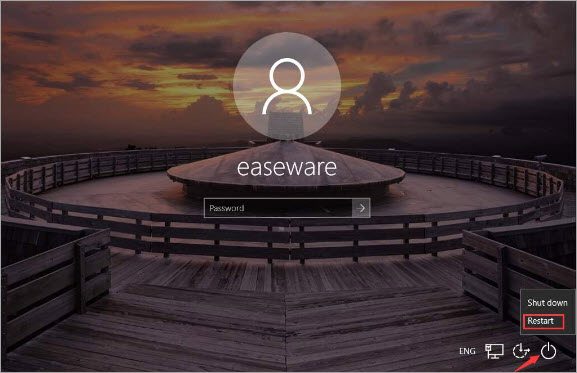
On your keyboard, hold down theShift key.
While holding down theShift key, click the power button at the bottom right of the screen, then selectRestart .

The Windows RE (Recovery environment) screen will then display.
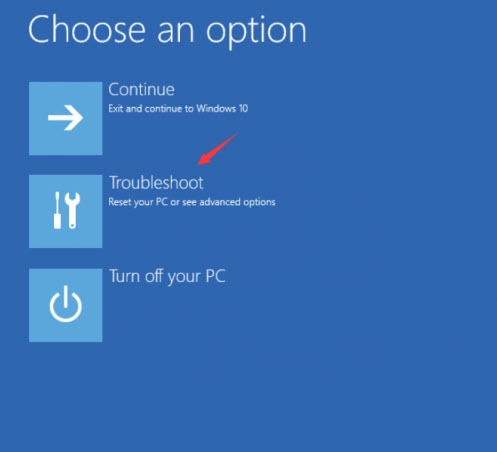
- Click Troubleshoot :
 PDF application, powered by AI-based OCR, for unified workflows with both digital and scanned documents.
 - Click Advanced options :

- Click Startup Settings :

- Click Restart .


Your computer will then restart and another screen opens showing a lot of different startup options.
- On your keyboard, press the number4 key to enter Safe Mode without internet access or the number5 key to enter Safe Mode with internet access:

WPS Office Premium ( File Recovery, Photo Scanning, Convert PDF)–Yearly
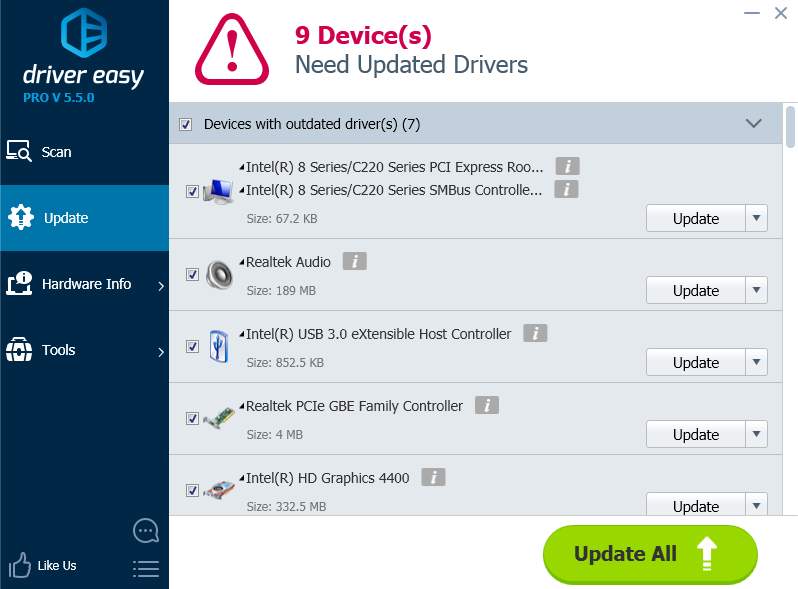
Can’t solve the problem? Try Driver Easy
If you couldn’t solve your computer problem in Safe Mode but you can still run Windows normally, give Driver Easy a try.
Many computer problems are caused by outdated device drivers. So updating your drivers should always be one of the first fixes you try.
Driver Easy will automatically update all your device drivers to the latest correct version with just a couple of clicks. It will automatically recognize your system and find the correct drivers for it. You don’t need to know exactly what system your computer is running, you don’t need to risk downloading and installing the wrong driver, and you don’t need to worry about making a mistake when installing.
You can update your drivers automatically with either the FREE or the Pro version of Driver Easy. But with the Pro version it takes just 2 clicks (and you get full support and a 30-day money back guarantee):
Download and install Driver Easy.
Run Driver Easy and clickScan Now button. Driver Easy will then scan your computer and detect any problem drivers.

- Click theUpdate button next to any flagged device to automatically download and install the correct version of that driver (you can do this with the FREE version).
Or clickUpdate All to automatically download and install the correct version of**all** the drivers that are missing or out of date on your system (this requires the Pro version – you’ll be prompted to upgrade when you click Update All).
- Title: Troubleshooting Windows Update Failures: A Comprehensive Guide
- Author: Frank
- Created at : 2024-08-16 13:03:43
- Updated at : 2024-08-17 13:03:43
- Link: https://tech-revival.techidaily.com/troubleshooting-windows-update-failures-a-comprehensive-guide/
- License: This work is licensed under CC BY-NC-SA 4.0.